2011-11-01, 11:49
Hi guys..
As you guys have provided so much input into my build, I thought I would share it with you.
First the hardware list
350W PSU, Be Quiet BN134
Asus P8H61-M PRO
Intel Core i3 2120 CPU
Scythe Shuriken BIG 120mm CPU cooler
Sony AD-7690H Slot DVD±R
4GB (2x2GB) Corsair DDR3 XMS3 Ram
64GB Crucial RealSSD M4, 2.5" SSD
Imon VFD/IR receiver
Logitech Edge keyboard mouse
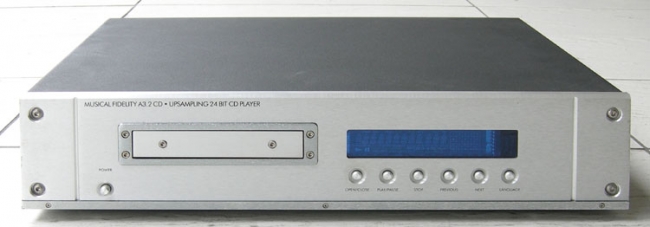
and most important, the gorgeous Musical Fidelity a3.2 CD player

A few years ago, I was able to pick up some dummy display shells for the entire A3.2 range. Basically the complete cases missing the internal electronics used for display purposes. I have the CD player, Tuner, and Amp.
I plan to use the Amp chassis for a later NAS project. I chose to use the CD player this time round purely because of the CD tray and the appropriate media buttons.
So lets begin.
Ask a responsible adult to crack out an angle grinder and cut a large hole in the back. I choose to cut a large hole and replace the back piece to remove unwanted holes left over from the cd player

Next, I got a sheet of 1mm aluminium (much easier to work with than steel) and I cut holes for the ATX IO plate and power supply. I glued the sheet to the back of the case and also folded the edges over of the holes I had cut to give nicer edges and to help secure the panel

I gave the back panel a quick rub with steel wool to get a nice brushed effect. I didnt spend too much time on it as its the back and I was short on time

I mounted the mobo on PCB stand offs that I screwed to the case from underneath then the board on top.
To mount the VFD, I cut the board for the original VFD that came with the CD player leaving just the buttons. I then mounted the Imon VFD behind the window, using the aluminium to make brackets. I have the optional button board for the Imon VFD so at a later date, I can wire the case buttons to the imon button board if I feel I need them.
SSD is attached to the side of the case with velcro tape

The CD tray for the player is narrower than a standard PC CD drive so I decided to go with a slot loader.
The slot load drive was wider than the slot in the front of the case so I removed the trim ring, filed to opening to match the drive and push fitted it in. I also created a shelf from the aluminium sheet and glued to the back of the front face below the drive to support the weight.
I am waiting for some 6mm aluminium to arrive so I can make a new trim ring to hide the drive

As you guys have provided so much input into my build, I thought I would share it with you.
First the hardware list
350W PSU, Be Quiet BN134
Asus P8H61-M PRO
Intel Core i3 2120 CPU
Scythe Shuriken BIG 120mm CPU cooler
Sony AD-7690H Slot DVD±R
4GB (2x2GB) Corsair DDR3 XMS3 Ram
64GB Crucial RealSSD M4, 2.5" SSD
Imon VFD/IR receiver
Logitech Edge keyboard mouse
and most important, the gorgeous Musical Fidelity a3.2 CD player

A few years ago, I was able to pick up some dummy display shells for the entire A3.2 range. Basically the complete cases missing the internal electronics used for display purposes. I have the CD player, Tuner, and Amp.
I plan to use the Amp chassis for a later NAS project. I chose to use the CD player this time round purely because of the CD tray and the appropriate media buttons.
So lets begin.
Ask a responsible adult to crack out an angle grinder and cut a large hole in the back. I choose to cut a large hole and replace the back piece to remove unwanted holes left over from the cd player

Next, I got a sheet of 1mm aluminium (much easier to work with than steel) and I cut holes for the ATX IO plate and power supply. I glued the sheet to the back of the case and also folded the edges over of the holes I had cut to give nicer edges and to help secure the panel

I gave the back panel a quick rub with steel wool to get a nice brushed effect. I didnt spend too much time on it as its the back and I was short on time

I mounted the mobo on PCB stand offs that I screwed to the case from underneath then the board on top.
To mount the VFD, I cut the board for the original VFD that came with the CD player leaving just the buttons. I then mounted the Imon VFD behind the window, using the aluminium to make brackets. I have the optional button board for the Imon VFD so at a later date, I can wire the case buttons to the imon button board if I feel I need them.
SSD is attached to the side of the case with velcro tape

The CD tray for the player is narrower than a standard PC CD drive so I decided to go with a slot loader.
The slot load drive was wider than the slot in the front of the case so I removed the trim ring, filed to opening to match the drive and push fitted it in. I also created a shelf from the aluminium sheet and glued to the back of the front face below the drive to support the weight.
I am waiting for some 6mm aluminium to arrive so I can make a new trim ring to hide the drive


